WDV Mailchimp Ajax
-
0. General information - top
WDV MailChimp Ajax (WordPress plugin) – with this plugin you can add ‘WDV MailChimp Ajax’ widget with subscribe form by MailChimp that using ajax.
You can change the design of the widget to attract attention to the subscription form. Visitors to your site who wished to subscribe to your newsletters will get the answer – you’re subscribed to our newsletter. Single opt-in – no confirmation email sending to subscribers.
If you have any questions, please contact us on email.
-
What is MailChimp? - top
Mailchimp is the leading email marketing platform. It is an tool to build and follow through on your sales funnel, and helps you create lasting relations with your site visitors and customers.
Beautiful and substantial opt-in forms help you grab the attention of your site visitors and convert them into subscribers and customers.
-
Why use ‘WDV MailChimp Ajax’? - top
By using this plugin your will allow visitors very easy to subscribe to your newsletter via subscription form added through widget.. It is easiest way to convert your site visitors into subscribers.
You can create good looking opt-in forms. You can add image in forms and change texts and backgrounds colors.
‘WDV MailChimp Ajax’ allows you to add unlimited Mailchimp sign up forms to your site. You can add different keys and Audience ID to different forms.
-
-
FAQ - top
-
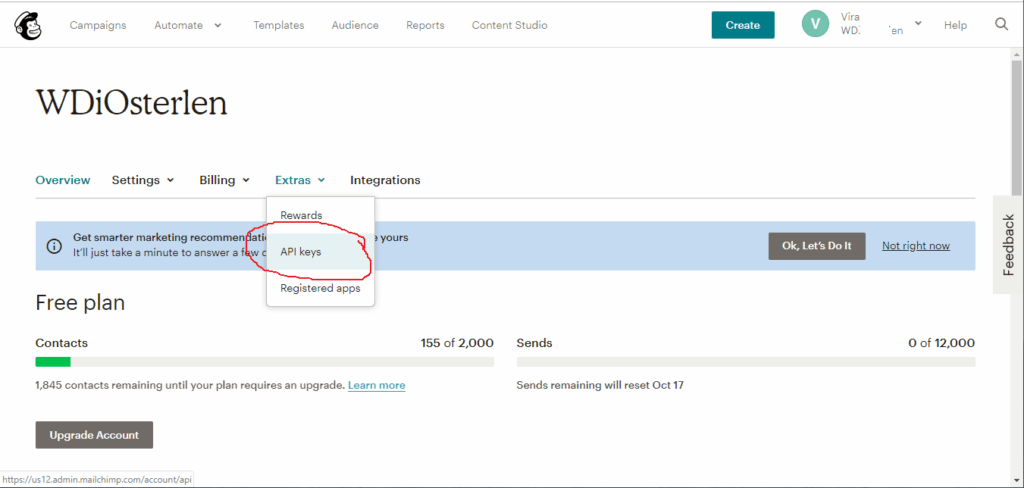
How find api key? - top
To find your MailChimp API Key:
- Log in to your MailChimp account at mailchimp.com.
- Then, from the menu on the top right, click on your Username, then select “Account” in the flyout menu.
- From the account page select “Extras”, “API Keys”. Your API Key will be listed in the table labeled “Your API Keys”.


-
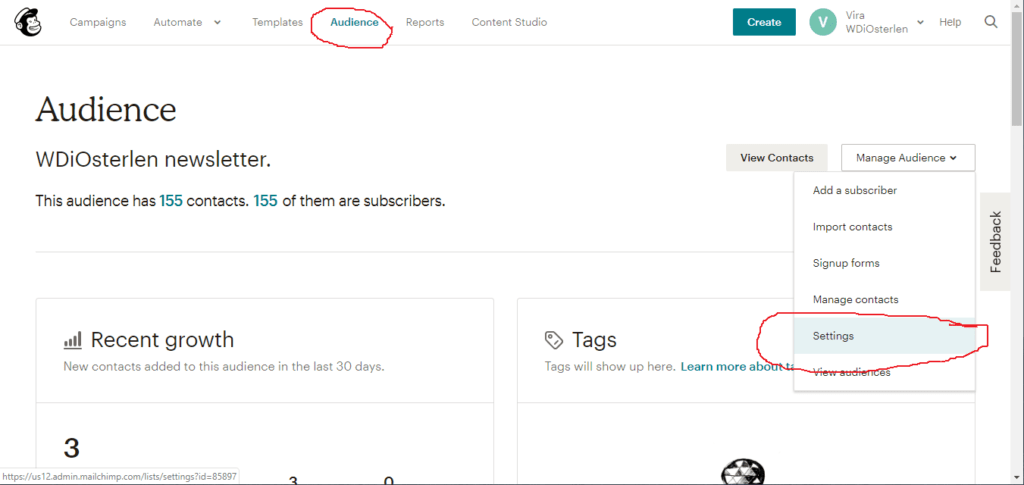
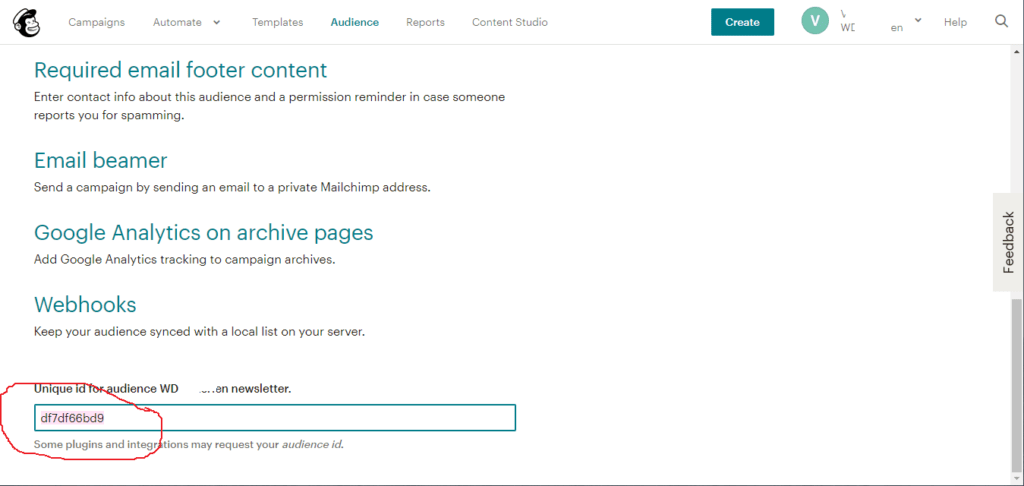
How find Audience ID? - top
To find your MailChimp Audience ID:
- Log in to your MailChimp account at mailchimp.com.
- Then, press “Audience” in the menu on the top and press “Settings”. You can find Audience ID below:


-
-
1. Installing - top
- Upload the plugin files to the '/wp-content/plugins/wdv-mailchimp-ajax' directory, or install the plugin through the WordPress plugins screen directly.
- In your WordPress administration, go to the Plugins page.
- Activate the WDV MailChimp Ajax plugin through the ‘Plugins’ screen in WordPress. Now you can find widget “WDV: Subscribe mailchimp” in list with all widgets.
- You can go to WP Customizer find section “Widgets” there, choose sidebar and you can place widget “WDV: Subscribe mailchimp” here.
- Or you can go to “Appearance > Widgets” and place the widget “WDV: Subscribe mailchimp” in your sidebar on this page.
-
2. How to use - top
FEATURES:
– Easy to use
– The design of the widget with attract attention to the subscription form.
– Use a different API key and different mailing list per different widgets.
– You can add as many widgets as you need.
– Single opt-in – no confirmation email send to subscribers.
– You can add image in this widget:
—- You can place image how background image for this widget.
—- Or you can add single image in this widget.
– You must add data from your Mailchimp account (Api key and Audience ID).
– You can change color of widget’s title, description, subscribe button background color, button text color. You can change background color for widget “WDV: Subscribe mailchimp”. You can create padding around the widget.
– Your subscribers will get the answer immediately – you’re subscribed to our newsletter.
– Latest Mailchimp API V3-
2.1 Add data from your Mailchimp account and add a title and description - top
You must have a MailChimp account and at least 1 list in your mailchimp account. You must write your API key and list ID in widget “WDV: Subscribe mailchimp”. (How find api key? How find list ID?). You can write widget title, description, text on button in widget “WDV: Subscribe mailchimp”.
-
2.2 The appearance of the widget by default - top
By default widget "WDV: Subscribe mailchimp" has the same design as the rest of your theme widgets.
-
2.3 Change the appearance of the widget - top
You can change the appearance of the widget “WDV: Subscribe mailchimp”:
- Create padding around the widget (in pixels)
- Change the color of the title
- Change the color of the description
- Change the color for the button background
- Change the color for the text on the button
- Change the color of the widget background
- You can change placeholder for e-mail and text on button
- You can add background image for this widget
- Or yoy can add image after widget's title. You can change size and border radius for single image
-
2.4 How does it work for your website visitors? - top
When your website visitors will click the subscribe button – they’ll get the answer you’re subscribed to our newsletter.

-
-
3. Real example - top
On this page you can find widget "WDV Mailchimp Ajax" in footer and you can wrire any e-mail and see answer from Mailchimp - you’re subscribed to our newsletter: anirohotel-light.wdvillage.com.